PUPS 7 | Concept Detailing
To see all the calculations and work below as well as the problem and description head to my Transforming Table page.
Problem
Small apartments need furniture to be multifunctional and flexible. Who has space for a coffee table and dinner table and work table? What if the same table can transform between the three?
Choose a Design!
The day has finally come to select a design. As you might guess, I'm going to move forward with the three-legged y shaped three bar linkage design using cables to move the bearings on the linear actuators. Through my error budget and and other analysis I've sufficiently proven to myself that it's worth moving forward and investing the time to build. So let's dive into the detailed design!
Part Selection
While attending the International Manufacturing Trade Show in Sept. 2017 I found a company called Igus that manufactures linear rails, bearings and many other plastic components. Their linear rails were sweet for this transforming table, but they didn't meet my cost functional requirement. Luckily, Igus agreed to send me the parts I needed as a sample -- thank you so much!

I selected the WSQ-10-40 square double rail for it's low profile, low-friction lubrication free sliding bearings, and stiffness. The accompanying bearings I chose are WJ200QM-01-10.
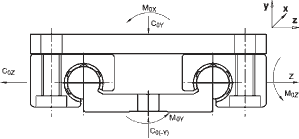

Figure 1: IGUS Drylin W Square rail and bearings with a diagram and table showing max force and moment loading for an assembled carriage
Notably, in the diagram above, the assembled carriage has 4 sliding bearings at a total carriage length of 100mm. My fully assembled carriage includes 2 sliding bearings, therefore I can assume that for my assembly within some range:
Coy = 540 lbs, Coz = 540 lbs, Mox~ 30 lbsft, Moy~ 40 lbsft, and Moz~ 40 lbsft. This data is from this IGUS site. These loads and moments are more than satisfactory for my use case with a factor of 10x less load on the bearings.
The sensitive direction in this design is along the bearing rail. I use gravity to preload the bearings on the rail, and the fixed and floating design of the bearing rails accommodates for errors in the parallelism of the rails. There are a number of advantages of IGUS' floating-fixed design including:
-
smooth gliding performance and maximizes bearing life
-
prevents binding caused by parallelism and misalignment errors
-
decreases necessary drive force and wear by minimizing friction-forces
-
enhances the precision of the system over the bearings' lifetime
-
reduces assembly time and cost
The actuator is also preloaded by gravity, which maintains tension in the wires, so that when the motor begins driving it is already pulling against the force of the table pulled downwards by gravity placing tension on the wires.
Preload increases friction on the bearings, thus reducing overall bearing life, but for this case the pitch, roll and yaw moments are minimized, and the forces on the bearing are 10x less than the rated forces, so the bearings (rated for several kilometers of travel) will outlive most of the other components on the desk.
I chose to use sliding bearings over rolling bearings primarily because of the cost-performance curve. Sliding bearings provided me the lifetime, low friction, and forces that I needed for much lower cost than rolling bearings. Furthermore, the really low friction plastic sliding surface in these bearings is lubrication free (which means less maintenance and dust and dirt). Sliding bears are often a good choice for medium force, low to medium speed applications.
Insert cost-performance curve & Ff calculation here
Insert load life calculations & data from IGUS
FUN Bearing_sliding_simply_supported_shaft
1. You must consider alignment tolerances: how will misalignment affect loads on these elements as the machine moves?
2. Design the support structures for the bearings and actuator and its attachment (this is where details covered in FUNdaMENTALS and PMD come to bear) to the rest of the machine to meet the stiffness and accuracy required: (2 pts)
a. Hand sketch and create/use design spreadsheets
b. What adjustment features or manufacturing tolerances are required to meet machine accuracy requirements and not overload the bearings?
Carriage Design
The carriage design is the most important part of this transforming table. The stiffness and geometry impacts preload of the bearings. The pin joint connection impacts friction and can create or limit moment about the bearings (leading to longer life). And even the connection with the pin impacts yielding of the material from moments on the pin creating edge loading.
The final design for my carriage looks like this:


Figure 2: Final carriage design, on the left red carriage top and bottom, on the right carriage with blue bearings, green pulley and gray bearing rail


This multifunctional carriage combines the bearing connection with the pulley attachment for actuating the leg. I intentionally designed it to be simple to manufacture, through a series of milling and hole drilling operations, optionally using a waterjet to cut the outline. The primary precision requirements for this part are the location of the center pin hole and the through holes for the bolts for the sliding bearings. The tolerances and dimensions for this part are shown in the engineering drawing attached below. Machine accuracy requirements are particularly important for bearing attachment to not overload the bearings, increasing friction. The fixed floating bearing configuration allows 2 mm of offset between the rails, which is plenty of slop with 0.1 mm machining tolerance on the part.
Figure 3: On the right, initial simple carriage design with press fit steel pin between sides to resist moment, would have been very easy to manufacture. On the left, shows how I checked that the carriage would not interfere with the sliding leg even at it's lowest height, while optimizing size for material costs.

To validate this design I focused on the pin joint connection, and the pulley connection. For the pin joint between the leg and the carriage, I calculated the point loading by the steel dowel pin on the hole. See handwritten calculations to the right and spreadsheet calculations below. I found that the max pressure at point 2 was at least a factor of 3 less than the yield strength of Aluminum 6061 for 6 mm wall thickness.
I also calculate the shear and bending moment for the pulley pin based on the pull force acting part way up the extruded pin. This calculation helped me choose between machining the aluminum pin, or press fitting a steel dowel pin.


Figure 4: On the right shows the carriage feature tree, and on the left shows the carriage in context on the bottom of the table.